
Showing posts with label Special Projects. Show all posts
Showing posts with label Special Projects. Show all posts
Thursday, 9 January 2014
The Year of 52 Blessings
Today on my way home from clearance sale shopping for next years snowsuits I went through the McDonalds drive through for a peppermint mocha. I will admit that first sip made me feel a little sad. Christmas really is over. A week ago I was thrilled to pack up Christmas and get back to "normal" life but today as I was taking that pepperminty sip I suddenly felt a longing for the colorful lights, the adorned tree, and the excited shopping. Now that I am home that feeling has certainly passed but I remember years past where I felt a very real sadness after the holiday season was over. I'm sure I am not alone as January can be a very depressing month with the dark days and freezing cold. But this year my little L and I decided that we were going to make 2014 into the year of 52 Blessings. Every week we will be finding something that we can do to bless others. This was our first week. The challenge is finding things to do that are relatively easy to accomplish with three kids in tow and something that L can easily help with. This week L decided to draw some pictures that we could mail to brighten someone's day. L drew three lovely pictures and we mailed them to some of my great aunts and uncles and my grandma. We wrote a little note that said we were thinking of them and hoped the picture brightened their day. L is super excited to put them in the mailbox today after school and I must admit that seeing her excitement makes me feel pretty proud. Looking forward to seeing what blessings we can come up with throughout the year. Any suggestions?

Wednesday, 26 June 2013
The Big Reveal - The Kiddo's New Bedroom
I am thrilled to say that the kids' bedroom is FINALLY finished! Woooo, hoooo! The hold up has been their bedding. I've been looking at the material for their duvet covers for months and months and just never had the energy to do it. Thankfully, I have some German stubbornness in me and this week I decided that no matter how tired I am or how sore my back is (that may be another post in the near future) I was going to get them done this week. And, I did it! So, here's their new room.


I wanted to make a room that was girly yet masculine enough
for a little boy as well. Somewhere along the way I got my mind stuck on
the kids having chevron duvet covers. I could not find what I had in mind
anywhere and when I found something close to what I wanted it was WAY out of my
price range. So, after ranting on Facebook about it, a friend of mine
sent me a link to making your own chevron duvet cover. Since the kids
beds are single beds and I wanted the print to be quite large the quilts were
actually pretty easy to make. A little time consuming but easy.


The room is SUPER small so I had to get creative to fit both kids plus their clothes into this one little room. I found some awesome plastic bins at Wal-Mart that slide nicely under the bottom bunk. We use one for T's diapers and the other two are for dirt clothes since there is no room in the closet for hampers.

That brings me to the closet. It is also pretty small and there is no room for a dresser anywhere else in the room. Again, had to get creative. I was planning on buying a closet organizer but then I found cube shelves on sale at Home Depot. They fit PERFECTLY into the closet without an inch to spare. Half of the cubes are for L and half are for T. We already had the upper shelves and closet bar in that closet so half become L's and half became T's. Each cube holds a different article of clothing (ie, t-shirts in one, long sleeves in one, pants in one, shorts in one, etc....). Underwear and socks go in baskets on top of the shelves for now.


L loves books and we have a lot, so yet another cube shelf is out in the room to hold books as well as to be the shelf for the CD player and basket containing CD's, Bible, and T's soothers (yes, he still has soothers).

Then on the wall I wanted each kid to have some space of their own. So, L's space has some old pics from my room when I was a little girl as well as a painting that our pastor's wife painted for me when I was born. T's space has a hockey picture from his aunt and uncle and some cars. I still need to get a letter T for his wall space.


So, that is the kiddos' new room. I think it turned out pretty cute and they sure do seem to love it :)

 |
| This was the kids art project during the winter. I taped their initials onto canvas and let them paint (clearly I helped T). Then when the paint was dry we took the tape off. They turned out really well. |
Thursday, 14 June 2012
My Weekly Pintrest Roundup
For a long time I fought the pressure to join Pintrest. Finally, and inevitably, a few months ago I caved and joined. Now, I am obsessed with doing something with all the things I've been "pinning". So, I decided to do a weekly blog roundup of my projects inspired by Pintrest. Some turned out really great and some made me want to pull my hair out and scream..... I may have actually done the screaming part. So, without further ado, I give you my Pintrest Weekly Roundup....

These little "burgers and fries" were a huge hit with my nieces and nephews (as well as with a few adults). They were super cute and very yummy. The bun is a cupcake cut in half and the burger is a brownie. The ketchup is made out of butter cream icing and the fries are sugar cookies. Yumm! My red ketchup did not turn out super well because I ran out of colour paste so it's a bit pink. I was kind of in a hurry as well so I left off the yellow mustard icing and the green lettuce icing. The website where I found these was awesome because she had free printables to make the little baskets to put the burger and fries in (you can't really see them in this picture) which made it even more cute. You can see the VERY nice original version here.

Some of you probably heard me rant about Jello cookies. These are them. SOOOO good..... if you like Jello. If you don't like that super tasty fake fruit flavour created by Jello then these are probably not the cookies for you. If you do love that taste then imagine Jello slamming into ultra yummy buttery sugar cookies. Addicting! Here's the recipe.
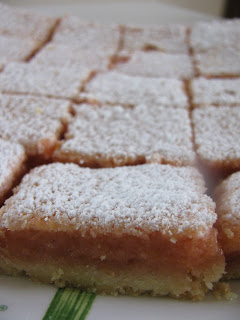
I brought these Strawberry Lemonade Bars to our preschool board meeting this week. I was surprised how quick and easy they were to make. Even my husband, who does not eat most baking, enjoyed these. He lit up when I came home with a few still on the plate. They are a very summery tasting square and they are a nice alternative to squares that almost always contain chocolate (not that I mind chocolate squares!).

This is not a picture of the Can of Dates I made but I realised that I never did take a picture of mine. Recently I planned a wedding shower for a close friend of mine and this site inspired me to have the ladies at the shower help create a Can of Dates for the bride-to-be. At every table there was a stack of scrapbook paper cut into squares. The ladies were each instructed to write on the back of the cute paper a date idea for the couple. At the end of the evening I collected all the papers and put them in a glass canister I found at the dollarstore. I put a cute little label on the canister and gave it to the bride-to-be at the end of the evening. There were some really great ideas that came in and it was a big hit with the bride.

One of L's preschool teachers retired this year so all the kids were asked to contribute one page to create a little going away book for her. I am such a sucker for anything that involves hand prints or footprints and I have so many art projects with prints pinned that I just had to try one out. L loved helping to make this. To ensure that the prints did not come out too goopy, I decided to use a paintbrush to cover L's feet with the paint. She laughed and laughed as I was painting. I'm not sure if the laughter was caused by tickling or if she just thought it was so silly that I would paint her feet with a brush. By using the paintbrush to apply the paint we were also able to give the "flower" portion of the picture two colours. It turned out super cute and I just wish that I had made one for us to keep. My inspiration came from here.

This was the project that made me scream. SOOOO frustrating! It was a good thing they turned out quite nice. These were an end of the year gift for L's preschool teachers. Theoretically, it's an easy project. All you do is wrap a glass vase with pencils and tie them up with a ribbon. *#!?. It's not that easy. I put some hockey tape around the vases and then put some Gorilla Glue on the tape to stick the pencils to. I thought this was a good idea because when they got sick of the pencils they could just pull them off, take off the tape and use the vase without having to scrape glue off of it. I still think that was a good idea but getting over 30 pencils to stand upright at the same time is NOT an easy task. After I got a hold of my temper I figured out a smart way to do the second vase. One day I will have to put a tutorial on this blog to help anyone else who tries to do this project. Luckily, her teachers really liked their gifts and L was very proud to give it to them. The beautiful peonie flowers are from our garden and opened up just the day before we needed them, thankfully :) Oh, and credit for this idea must go here.
Well, I think that may be enough Pintrest plugs for now. Needless to say, I am really enjoying all the things I am finding and I'm sure this will not be my last Pintrest Roundup :)


I brought these Strawberry Lemonade Bars to our preschool board meeting this week. I was surprised how quick and easy they were to make. Even my husband, who does not eat most baking, enjoyed these. He lit up when I came home with a few still on the plate. They are a very summery tasting square and they are a nice alternative to squares that almost always contain chocolate (not that I mind chocolate squares!).
This is not a picture of the Can of Dates I made but I realised that I never did take a picture of mine. Recently I planned a wedding shower for a close friend of mine and this site inspired me to have the ladies at the shower help create a Can of Dates for the bride-to-be. At every table there was a stack of scrapbook paper cut into squares. The ladies were each instructed to write on the back of the cute paper a date idea for the couple. At the end of the evening I collected all the papers and put them in a glass canister I found at the dollarstore. I put a cute little label on the canister and gave it to the bride-to-be at the end of the evening. There were some really great ideas that came in and it was a big hit with the bride.

One of L's preschool teachers retired this year so all the kids were asked to contribute one page to create a little going away book for her. I am such a sucker for anything that involves hand prints or footprints and I have so many art projects with prints pinned that I just had to try one out. L loved helping to make this. To ensure that the prints did not come out too goopy, I decided to use a paintbrush to cover L's feet with the paint. She laughed and laughed as I was painting. I'm not sure if the laughter was caused by tickling or if she just thought it was so silly that I would paint her feet with a brush. By using the paintbrush to apply the paint we were also able to give the "flower" portion of the picture two colours. It turned out super cute and I just wish that I had made one for us to keep. My inspiration came from here.

This was the project that made me scream. SOOOO frustrating! It was a good thing they turned out quite nice. These were an end of the year gift for L's preschool teachers. Theoretically, it's an easy project. All you do is wrap a glass vase with pencils and tie them up with a ribbon. *#!?. It's not that easy. I put some hockey tape around the vases and then put some Gorilla Glue on the tape to stick the pencils to. I thought this was a good idea because when they got sick of the pencils they could just pull them off, take off the tape and use the vase without having to scrape glue off of it. I still think that was a good idea but getting over 30 pencils to stand upright at the same time is NOT an easy task. After I got a hold of my temper I figured out a smart way to do the second vase. One day I will have to put a tutorial on this blog to help anyone else who tries to do this project. Luckily, her teachers really liked their gifts and L was very proud to give it to them. The beautiful peonie flowers are from our garden and opened up just the day before we needed them, thankfully :) Oh, and credit for this idea must go here.
Well, I think that may be enough Pintrest plugs for now. Needless to say, I am really enjoying all the things I am finding and I'm sure this will not be my last Pintrest Roundup :)
Tuesday, 24 January 2012
Vacation Sewing Projects
I have been super excited the last few weeks since we booked our winter vacation. We are so blessed to be able to get away for a while as a family. I decided to go through the kids summer clothes to see what still fits from last summer. Well, T is in a bit of trouble cause he does not have much that fits. He is going to need stuff for the coming summer as well so I guess I will just have to do a bit of shopping on our vacation. Woe is me ;) L, on the other hand, has two pairs of shorts that we can make work and several t-shirts. However, I am not going to fool myself into thinking that she is going to wear shorts and a shirt. No way. I am sure that the second we arrive in the warm weather she will be whining for a sundress. I lucked out the other day at the new Carters/Oshkosh store and found cute sundresses for $7 so I picked two up. Then I began thinking about the pile of material scraps I have in my laundry room and wondered if I could make anything for L out of them. So I started looking online and came across the cutest wrap dress here and an adorable skirt here. So, I pulled out the old sewing machine and spent a few afternoons making L two dresses and a skirt. I taught myself to sew about two years ago so my knowledge is pretty limited. I have never sewn with a pattern nor have I ever sewn anything gathered so it was a learning experience. Now L has a few new things to wear on our trip and I learnt some new things. All in all, I am very happy with the outcome.
 |
| All the projects look pretty similar since I used the same fabric in all of them but since it was all left over from other projects it didn't cost me anything :) |
 |
| This was my first attempt at the wrap dress. I bought these fabrics almost two years ago to make a quilt for L's big girl bed. The quilt never got made but I put the fabric to good use in several different projects. |
 |
| This is my second attempt at the wrap dress. The bottom material is from a Christmas dress I made L two years ago (my first sewing project) so it's a bit Christmasy but it's still cute :) |
 |
| The thing I love about this skirt is that the top fabric is actually from some old pillowcases my parents had in the 70's :) |
 |
| My crazy-haired model! |
Wednesday, 28 December 2011
L's Made-With-Love Christmas Present
A few months ago I came accross a webpage that had the idea to convert an old entertainment unit into a play kitchen for kids. I loved the idea and I hadn't had a new project in a long time. So, after looking on kijiji for a while I found this entertainment unit.

It was in super great shape so I didn't need to paint the entire unit. My Dad helped me cut the door for the fridge and cut a piece to fill the whole in the back. Then I painted all the doors with chalkboard paint, installed them and put on handles. The fridge and cupboard open up sideways but the stove opens up and down just like a real stove. Then we cut a hole for the sink (a $2 bowl from the dollarstore) and mounted the elements (another dollarstore find). Then after a little paint and some curtain sewing it was complete. I think it turned out really cute and I hope L has many years of fun playing with it.


It was in super great shape so I didn't need to paint the entire unit. My Dad helped me cut the door for the fridge and cut a piece to fill the whole in the back. Then I painted all the doors with chalkboard paint, installed them and put on handles. The fridge and cupboard open up sideways but the stove opens up and down just like a real stove. Then we cut a hole for the sink (a $2 bowl from the dollarstore) and mounted the elements (another dollarstore find). Then after a little paint and some curtain sewing it was complete. I think it turned out really cute and I hope L has many years of fun playing with it.


Subscribe to:
Posts (Atom)